November 9, 2012
-
How to make a perfect PIE CRUST
I have such warm memories of my childhood holidays and many of them revolve around time spent at my Grandma’s farm. My sister and I and our cousins would romp through the pasture.. down to the back of the berry bushes and look for tadpoles in the small pools of water.
My grandma was a ‘down home’ cook. She fried her own chicken (which she had raised) and did a lot of canning. But, my favorite memories are her pies. She made every kind of pie you could imagine from mince meat to green tomato along with all the favorites. I made it my goal, as a young wife, to learn how to make pies just like Grandma. Unfortunately, I never learned how to make her pie crust before she died.
Years later a young mother brought a homemade pie to a church Pot Blessing and the crust was so good that I asked for the recipe. I’ve been making it ever since and shared the recipe with many women over the years.
Perfect Pie Crust (Makes 2 full pie crusts)
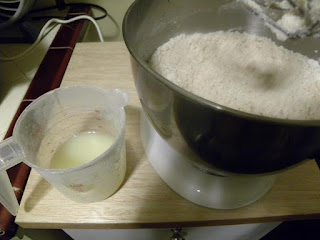
4 cups flour
2 teaspoons salt
1 tablespoon sugar
1 3/4 c. Crisco shortening (don’t use generic brands.. it really does make a difference)
1/2 c. water
1 egg
1 tablespoon vinegarMix the flour, salt and sugar in a large bowl. Add the shortening. Here I am using my Kitchen Aid but you can use any large bowl and a pastry cutter or a large fork to cut in the shortening. When I use my Kitchen Aid I use the whisk until the dough resembles very, very small peas. But don’t whisk it too long or the dough will start clumping together too soon.

Next, I run 1/2 cup water into a measuring cup, break the egg straight into the cup and add the tablespoon of vinegar. Mix it together and then add to the flour/shortening mixture. I change attachments on my Kitchen Aide at this point and use the mixing paddle to gentle mix it together just until it starts clumping together and clearing away from the side of the bowl.

I wet my rolling board with a wet wash cloth and place two pieces of Seran wrap next to each other so that it will cover a large surface and then I sprinkle a small amount of flour onto the Seran wrap.. not too much…maybe 3 tbsp. or so.. just enough to dust the seran wrap. I take a handful of dough (the dough will make 2 full pies with top and bottom crust) and place it on the seran wrap and then flip it over so that there is a small amount of flour on both sides of the dough. I put one more piece of Seran wrap on top of the dough. So, now you have Seran wrap (2 pieces) underneath the dough and one piece on top. I then use my rolling pin and roll it out thin.

Next, I take the top layer of Seran wrap off of the dough and place my right hand
underneath the bottom layers of Seran wrap and lift up the crust so it can be flipped it into the pie pan.
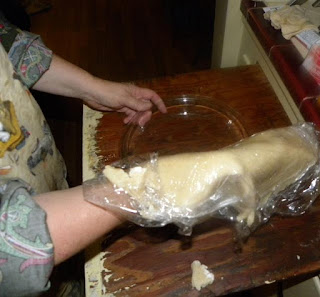 (The Seran wrap is still on both sides of this dough in the picture because I’m not baking pies today. I just wanted to show you how easy it is to roll out a pie crust with this method. )
. Peel off the last pieces of Searn wrap and gently press the dough into the pan. Cut off any excess dough around the edges and flute your edges and your done.If you decide to not bake your pie crust right now you can leave all the Seran wrap on when you initially roll out the dough. Fold it in 1/4′s and then put the dough into a large gallon freezer bag. You can then either keep it in the fridge for up to a week or freeze it for at least a month. I made up quite a few batches of dough, rolled them out and then froze them for the holidays. It makes the baking process much easier when the dough is already made.And there you go!


Comments (5)
Thanks,I have never been able to make a good pie crust. My dil gave me the recipe she uses, Sylvia’s pie crust, but it does not taste the same. Now if you can just tell me how to make a good GF one
Thanks, Georgene! I’m always on the look out for a better way to do things, and I’d love to give your pie crust recipe and method a try. Perhaps even this week!
@oldfatgramma - I wish I knew of one!
@copperswife - I hope it works for you Cheryl!
Thanks for this recipe and great photos, Georgene!
I love anything to do with baking, but even tho I’ve tried, I’ve never really mastered the pie crust …
I’ve heard it takes lots of practice! I like mine flaky, too!
Hope you had a blessed Thanksgiving! It was over too soon for me!
I haven’t been here in awhile, and have missed blogging so I’m back,
and looking forward to sharing again! I just subscribed to you, too …
I know we’ve visited one another in the past, and I look forward to following you!
You have a blessed weekend!!
~ Deborah <><